Before we get to the fun parts, such as setting up enemies and quests, I first want us to get the creation of the game’s GUI out of the way. The GUI will allow us to visually show the changes in our player’s stats, such as their ammo and pickup amounts, health and stamina values, and current XP and level. By creating the basic user interface first, we can eliminate the problem of having to constantly check if these values are being influenced or changing via the console output.

Figure 10: GUI Layout plan.
This part, like the TileMap’’s part before, might be a bit long, so I’m going to break our GUI creation into three manageable parts: Health & Stamina; Pickups; and XP and Leveling.
WHAT YOU WILL LEARN IN THIS PART:
· How to add UI elements to your scene.
· How to duplicate nodes.
· How to update UI elements via custom-signals.
· How to change the anchoring of nodes.
· How to create, initialize, and connect custom-signals.
In your Player Scene, add a new CanvasLayer node. This node will serve as the container for the graphics that we will draw onto the screen, such as our progress bars or labels. We are adding the UI elements to the Main scene because we want to connect these elements from our instantiated Player script via signals to update their values.

Let’s also go ahead and rename it as UI, just so that it stays nice and organized.

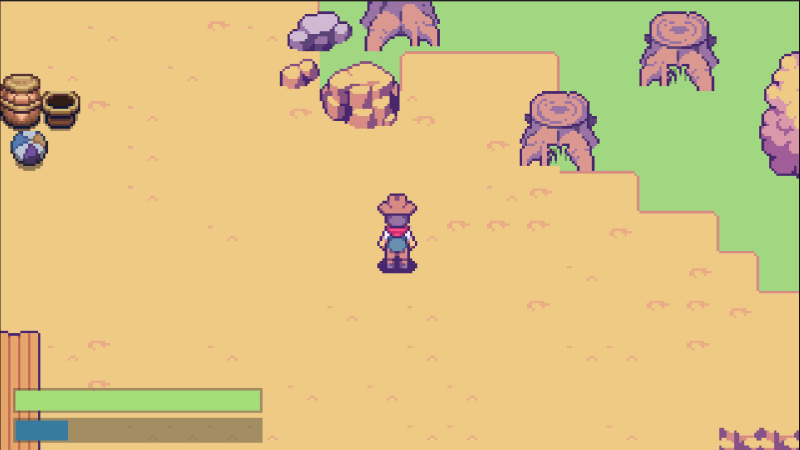
We want the UI elements to be contained within the borders of the blue frame on your screen. I hid my existing nodes so that we can solely focus on the UI for now, so don’t panic if you see that I don’t have a map or player anymore!

HEALTH & STAMINA BARS
Let’s add a ColorRect node as a child to the UI node. This draws a rectangle that we can fill with color. This node will serve as our progress bar for our health values.

Add another ColorRect node to your newly added node. Rename the first ColorRect as HealthBar, and the second ColorRect as Value. The outer rectangle (HealthBar) will serve as the box or border for our progress bar, and the inner rectangle (Value) will be the actual color that changes to show the progress value.

Now, in the Inspector panel, underneath Layout > Transform, change the HealthBar node size to x: 100, and y: 10. Do the same for the Value node, but change its x: 98, and y: 8.


We also want to center our Value rectangle inside of the HealthBar rectangle. To do this, change its anchor preset to center.

Change the color of the HealthBar to #3a39356a, and the color of Value to #a4de79. In my game, the healthbar will be green, but you can change this color to whatever your heart desires.


Let’s anchor our healthbar to the bottom-left of our screen. In your Inspector panel, underneath Layout, change the anchor preset from center to bottom-left, and its position values to x: 5, y: 155.

Duplicate the entire HealthBar node (with its child-node Value) and rename it to StaminaBar.

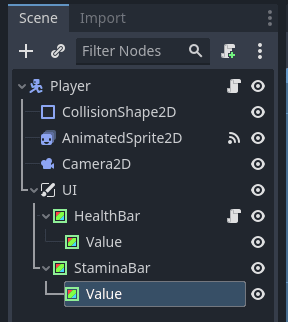
Change the color of the Value node within StaminaBar to #377c9e. This will make it a blue color, but once again, this is your game so make it any color you’d like.

Let’s also anchor our stamina bar to the bottom-left of our screen. In your Inspector panel, underneath Layout, change the anchor preset from center to bottom-left, and its position values to x: 5, y: 165.

Now we have our health and stamina progress bars set up! We can now go ahead and implement the functionality for these elements in our code.
In our Player script, we need to add variables to capture our health value, max health, and health regeneration value, as well as the same for our stamina. On top of your Player.gd script, underneath the is_attacking code, let’s add these variables.
    ### Player.gd
    # older code

    # UI variables
    var health = 100
    var max_health = 100
    var regen_health = 1
    var stamina = 100
    var max_stamina = 100
    var regen_stamina = 5
With our variables created, we need to create custom signals for both health and stamina so that other objects in our game can listen and react to change events, without directly referencing one another. In other words, these signals will notify our game that a change in our health or stamina values has occurred, and then trigger other events to occur because of this.
If our health and stamina variable changes, we want to fire off the signal to it so that visually these changes are shown in our progress bar and our health value is updated. We worked with signals before when we connected the built-in on_animation_finished() signal to our player script, but this time, we will create our own custom signal.
Why use custom signals?
While built-in signals cover a lot of common use cases (like button clicks or mouse events), they may not handle all the specific interactions or events that are unique to your game or application. Custom signals provide a way to define your own set of events that are specific to your game’s logic, making your codebase more organized, reusable, and maintainable.
Now, before we create our custom signal, let’s try and understand when we want these signals to emit and notify our game that our health and stamina values have changed. We want the signals to emit when we press the sprint input, and when we get damaged from a bullet or drink a health potion later on.

Figure 12: Custom signal overview
We will add our custom signals to the top of our code because we will add more signals later on. This will keep all of our signals neat and organized. To define custom signals, we use the keyword signal followed by the name of the signal. Our signals will update our health and stamina values, so we will call them health_updated and stamina_updated.
    ### Player.gd
    # older code
    # Custom signals
    signal health_updated
    signal stamina_updated
Now that we have our signals and variables created, we also need to constantly check them to see if our health or stamina values need to be updated or regenerated. We can do this check in the _process() function, which will be called every time a frame is drawn (60 times a second). The function has a parameter called delta, which represents the elapsed time that has passed since the previous frame.
For each health and stamina, we need to calculate the updated values for each. We will do this by using the min() method, which will ensure that it will never exceed the maximum values of our max_health and max_stamina variables. Inside this min() function, we will calculate the updated value of our health and stamina variables and add it to the value of these variables that are captured in the current frame.
    ### Player.gd

    # older code

    # ------------------------- UI --------------------------------------------------
    func _process(delta):
        #calculate health
        var updated_health = min(health + regen_health * delta, max_health)
        #calculate stamina
        var updated_stamina = min(stamina + regen_stamina * delta, max_stamina)
If these values are different than our original values (var health and stamina), we will then update our health to the new value and emit our signal to notify the game of this change.
    ### Player.gd

    # older code

    # ------------------------- UI --------------------------------------------------
    func _process(delta):
        #regenerates health
        var updated_health = min(health + regen_health * delta, max_health)
        if updated_health != health:
            health = updated_health
            health_updated.emit(health, max_health)
        #regenerates stamina
        var updated_stamina = min(stamina + regen_stamina * delta, max_stamina)
        if updated_stamina != stamina:
            stamina = updated_stamina
            stamina_updated.emit(stamina, max_stamina)
While we’re at it, let’s update our sprinting input action to use up some of our stamina when pressed. You’ll notice that we emit the signal via the .emit() method. This emits this signal, and all the callables connected to this signal will be triggered. We’ll create functions in our UI script which will be our callables, and so if the signal is emiited, this callable will be notified to update our UI components.
    ### Player.gd

    # older code

    # --------------------------------- Movement & Animations -----------------------
    func _physics_process(delta):
        # Get player input (left, right, up/down)
        var direction: Vector2
        direction.x = Input.get_action_strength("ui_right") - Input.get_action_strength("ui_left")
        direction.y = Input.get_action_strength("ui_down") - Input.get_action_strength("ui_up")
        # Normalize movement
        if abs(direction.x) == 1 and abs(direction.y) == 1:
            direction = direction.normalized()
        # Sprinting
        if Input.is_action_pressed("ui_sprint"):
            if stamina >= 25:
                speed = 100
                stamina = stamina - 5
                stamina_updated.emit(stamina, max_stamina)
        elif Input.is_action_just_released("ui_sprint"):
            speed = 50
        # older code
You’ll notice that we passed our stamina variables as parameters into our signal. Since we’ll be using these signals to update our progress bars in our UI, passing both health/stamina and max_health/max_stamina in the signals provides the necessary information for UI components to accurately and flexibly display the player’s stamina status. It also ensures consistency and efficiency in the game’s code.
Now we need to connect our signal to our UI components (callables), so in your Player scene add a new script to both HealthBar and StaminaBar and save these scripts under your GUI folder. Call the one Health and the other one Stamina.


In your newly created Health.gd script, let’s create an @onready variable for the value of our HealthBar/Value node.
    ### Health.gd
    extends ColorRect
    # Node refs
    @onready var value = $Value
We then need to create a function that will update the color value of the Value node. We can do this by multiplying its width (98) by the value of the player’s health divided by max_health. This will return a percentage value that will reflect our Value node’s new width.
    ### Health.gd

    extends ColorRect

    # Node refs
    @onready var value = $Value

    # Updates UI
    func update_health_ui(health, max_health):
        value.size.x = 98 * health / max_health
Do the same for your stamina value in Stamina.gd.
    ### Stamina.gd

    extends ColorRect

    # Node refs
    @onready var value = $Value

    # Updates UI
    func update_stamina_ui(stamina, max_stamina):
        value.size.x = 98 * stamina / max_stamina
Now we can connect the functions from our UI components to our signals in our built-in _ready() function. This function will connect our callables to our signal when the Player node enters the Main scene — thus the UI will be able to update the progress bars upon game load.
When to use _ready()?
We use the _ready() function whenever we need to set or initialize code that needs to run right after a node and its children are fully added to the scene. This function will only execute once before any _process() or _physics_process() functions.
We will connect our Player’s health_updated signal via the connect keyword, and the callable that it will connect to is our HealthBar’s update_health_ui function. This means each time there is a change in our health value, the player script will emit the signal, and our healthbar will update its value. We’ll create a node reference to our HealthBar and StaminaBar nodes so that we can access the functions from their attached scripts.
    ### Player.gd

    extends CharacterBody2D

    # Node references
    @onready var animation_sprite = $AnimatedSprite2D
    @onready var health_bar = $UI/HealthBar
    @onready var stamina_bar = $UI/StaminaBar

    # older code

    func _ready():
        # Connect the signals to the UI components' functions
        health_updated.connect(health_bar.update_health_ui)
        stamina_updated.connect(stamina_bar.update_stamina_ui)
If you run your scene now and you sprint, you will see that the stamina bar decreases, as well as regenerates!
Let’s move on to our next GUI part for our Pickups UI. Remember to save and to make a backup of your project, and I’ll see you in the next part.
Your final code for this part should look like this.

FULL TUTORIAL
The tutorial series has 23 chapters. I’ll be releasing all of the chapters in sectional daily parts over the next couple of weeks.
If you like this series or want to skip the wait and access the offline, full version of the tutorial series, you can support me by buying the offline booklet for just $4 on Ko-fi!😊
You can find the updated list of the tutorial links for all 23 parts in this series here.


