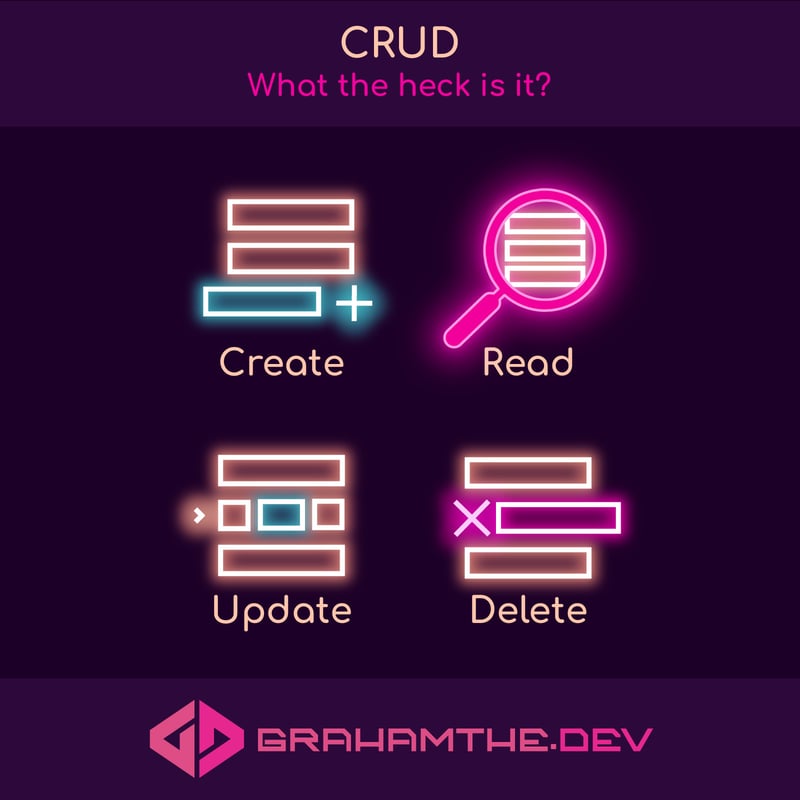
What the heck is CRUD?
Well it is used as a polite swear word in the UK, but in the context of software development it stands for:
- Create
- Read
- Update
- Delete
It forms the basis of a lot of software.
Let’s learn the basics of CRUD in SQL:
Introduction
To make this easy to understand, let’s imagine we have a list of people and their email addresses.
Let’s assume we already have a table in our Database called “contacts” that has 4 columns:
- ID (primary key, auto increment)
- firstName
- lastName
We also already have two records in that table:
| ID | firstName | lastName | |
|---|---|---|---|
| 1 | Mary | Simmons | [email protected] |
| 2 | Fred | Griffith | [email protected] |
Let’s see how we could add a record to our table (Create)
C - Create
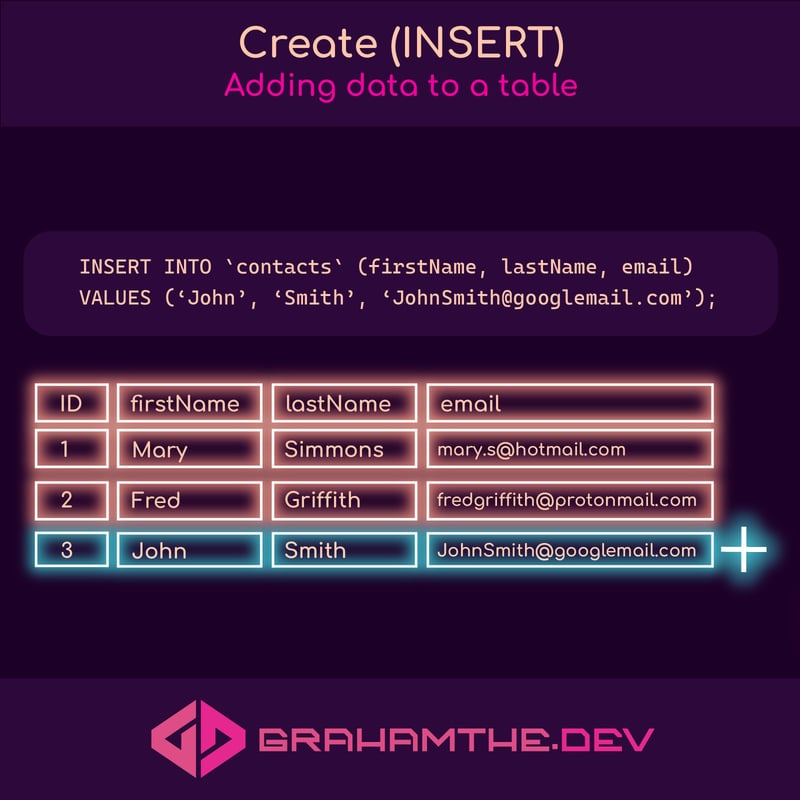
To create a record in SQL we use the INSERT command.
Let’s assume we have been given the following information to add to our database:
- First name: John
- Last name: Smith
- Email: [email protected]
We can add that to our database table using the following SQL statement:
INSERT INTO `contacts` (firstName, lastName, email)
VALUES (‘John’, ‘Smith’, ‘JohnSmith@googlemail.com’);
Let’s break this down:
** INSERT INTO**
is our command that let’s us create a new row in our table
contacts
is the table we want to insert into
(firstName, lastName, email)
are the columns that we want to add data to
VALUES ('John', 'Smith', 'John....com');
is the data we want to add.
Notice that there are 3 columns in the first set of parentheses and those correspond to the values in our second set of parentheses.
We could also do:
INSERT INTO `contacts` (lastName, email, firstName)
VALUES (‘Smith’, ‘JohnSmith@googlemail.com’, ‘John’);
And this would also work as the order of the columns specified in the first part still match the data in the second part. (note that it is not a good practice to put columns in a different order to how they appear in the table, and this was just for demonstration purposes).
One thing to note, our table has 4 columns, but we only added 3 values, what happened to the ID?
Well typical (and in this instance) the ID on a table would have “auto increment” set.
This means that it will automatically add a value here that is 1 higher than the table’s current max index.
In fact, we can now Read the table data using SQL to check the result of our INSERT statement.
R - READ
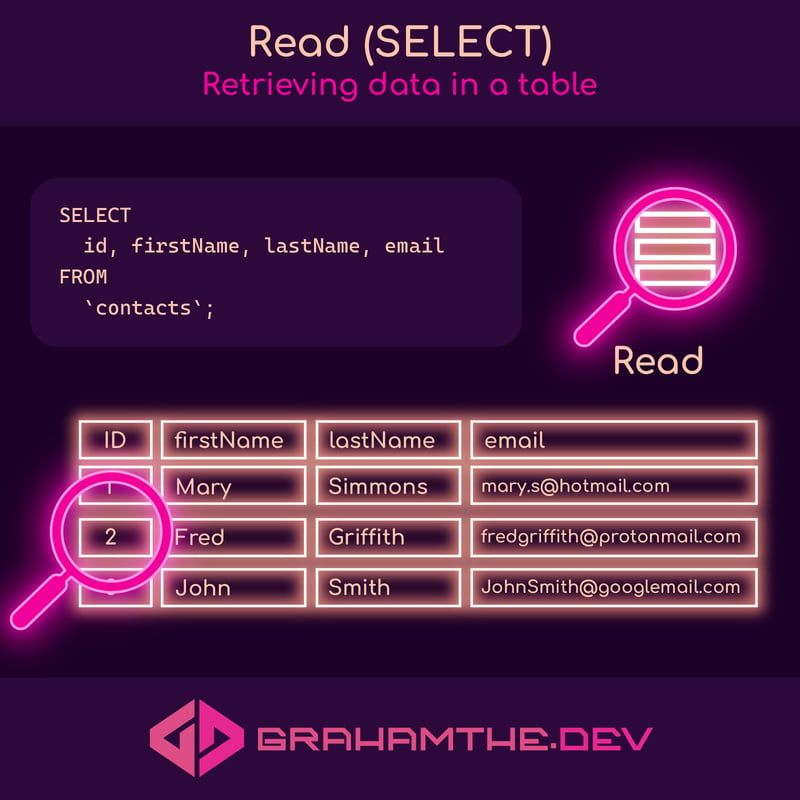
Once a table has data in it we want to be able to retrieve it.
For that we use SELECT in SQL.
And in it’s simplest form a SELECT statement looks like this:
SELECT * FROM `contacts`;
The * symbol is shorthand for “every column”.
It is equivalent to doing:
SELECT id, firstName, lastName, email FROM `contacts`;
Let’s check out our data.
| ID | firstName | lastName | |
|---|---|---|---|
| 1 | Mary | Simmons | [email protected] |
| 2 | Fred | Griffith | [email protected] |
| 3 | John | Smith | [email protected] |
If you remember we didn’t specify an ID when we added John’s record, but because of auto-increment we were automatically given an ID number for that row / record.
And that is it, we have successfully added a row to our table and retrieved the information!
But, what happens if someone changes their email address? How do we update a record?
U - UPDATE
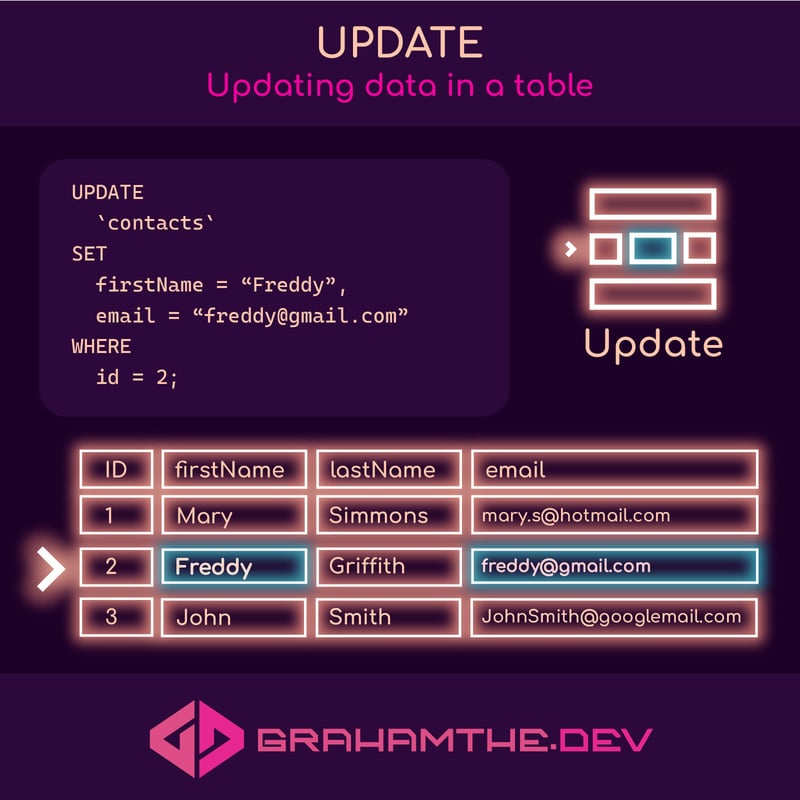
We just found out that Fred has a new email address, which is [email protected], so we need to fix that!
To change an existing record in a table we use the UPDATE command.
Now, before we can use this command effectively we also have to introduce a second Command: WHERE.
WHERE is used to set some criteria on our query. Think of it like a filter.
In this instance we want to update the record with an ID of “2” as that is Fred’s record.
So our UPDATE statement would look like this:
UPDATE `contacts`
SET email = “freddy@gmail.com”
WHERE id = 2;
Let’s break that down:
UPDATE contacts
tells the database which table we want to update.
SET field/column = “value”
tells the database that we want to set a certain column to a new value.
WHERE
is our other new command that let’s us specify that we only want to update the column in the row with an ID of 2.
It is worth noting that if we found out that Fred would also prefer to be called “Freddy”, we could update both columns at the same time like this:
UPDATE
  `contacts`
SET
  firstName = “Freddy”,
  email = “freddy@gmail.com”
WHERE
  id = 2;
And now that we have learned the basics of WHERE we can also check that the row has updated correctly:
SELECT
  *
FROM
  `contacts`
WHERE
  id = 2;
And would you look at that:
| ID | firstName | lastName | |
|---|---|---|---|
| 2 | Freddy | Griffith | [email protected] |
Everything is updated!
Now the final part of CRUD - deletion!
D - DELETE
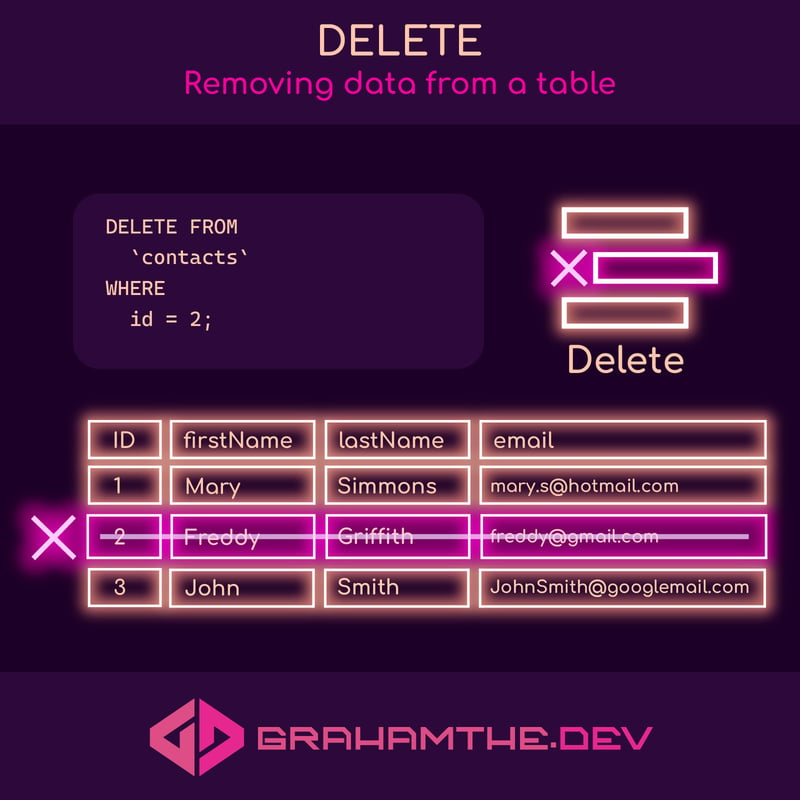
Deleting can only happen at a row level (i.e. you cannot just delete a firstName for somebody…you would do that with an UPDATE and set the value to null).
Let’s assume that after a while Freddy decides that he does not want to be on our contacts list anymore and wants his data deleted.
Let’s remove Freddy from the table.
Delete statements are really straight forward:
DELETE FROM `contacts` WHERE id = 2;
Let's break it down again:
DELETE FROM contacts
specifies the table we want to delete from
WHERE id = 2
specifies which row we want to delete.
And this time, that is all there is to it!
After running our DELETE command the table looks like this:
| ID | firstName | lastName | |
|---|---|---|---|
| 1 | Mary | Simmons | [email protected] |
| 3 | John | Smith | [email protected] |
Notice how the ID numbers do not change. It is also worth noting that if we inserted a new row the ID of that row would be set to 4, it is always from the current index of the database (and if we deleted all the rows and added a new row it would still be an ID of 4!).
Wrapping up.
CRUD forms the basis of a lot of software applications, and learning the basics like we did here can get you quite a long way!
We obviously didn’t cover a lot of things in SQL such as JOIN, DISTINCT etc. but hopefully this will give you a quick introduction to SQL and CRUD operations that is enough to build your first CRUD application or API.
Happy new year and even happier coding everyone! 💪🏼💗


